TourTask

Get organized.
{{ siteLang.title }}
getyourguide

GetYourGuide Integration Guide

Learn how to integrate GetYourGuide with TourTask to enable instant bookings and live availability updates on the GetYourGuide platform.

What is GetYourGuide?

GetYourGuide was founded in 2009 in Berlin, Germany, and has since grown into one of the world's premier platforms for booking tours, activities, and attractions. It connects travelers with unforgettable experiences, offering a vast selection curated by local experts. With a particularly strong presence in Germany, the rest of Europe, and North America, GetYourGuide caters to a global audience of travelers seeking high-quality, reliable experiences.

The platform stands out for its user-friendly interface, instant booking confirmations, mobile tickets, and flexible cancellation options, making it easy for travelers to discover, book, and manage their activities. By partnering directly with tour operators and activity providers, GetYourGuide ensures access to unique and exclusive experiences that enhance any travel adventure. Integrating GetYourGuide with TourTask allows you to seamlessly manage bookings and reach a global audience, boosting your visibility and reliability in the competitive tours and activities market.

How to integrate GetYourGuide with TourTask

Follow the steps below to start receiving instant bookings from GetYourGuide.

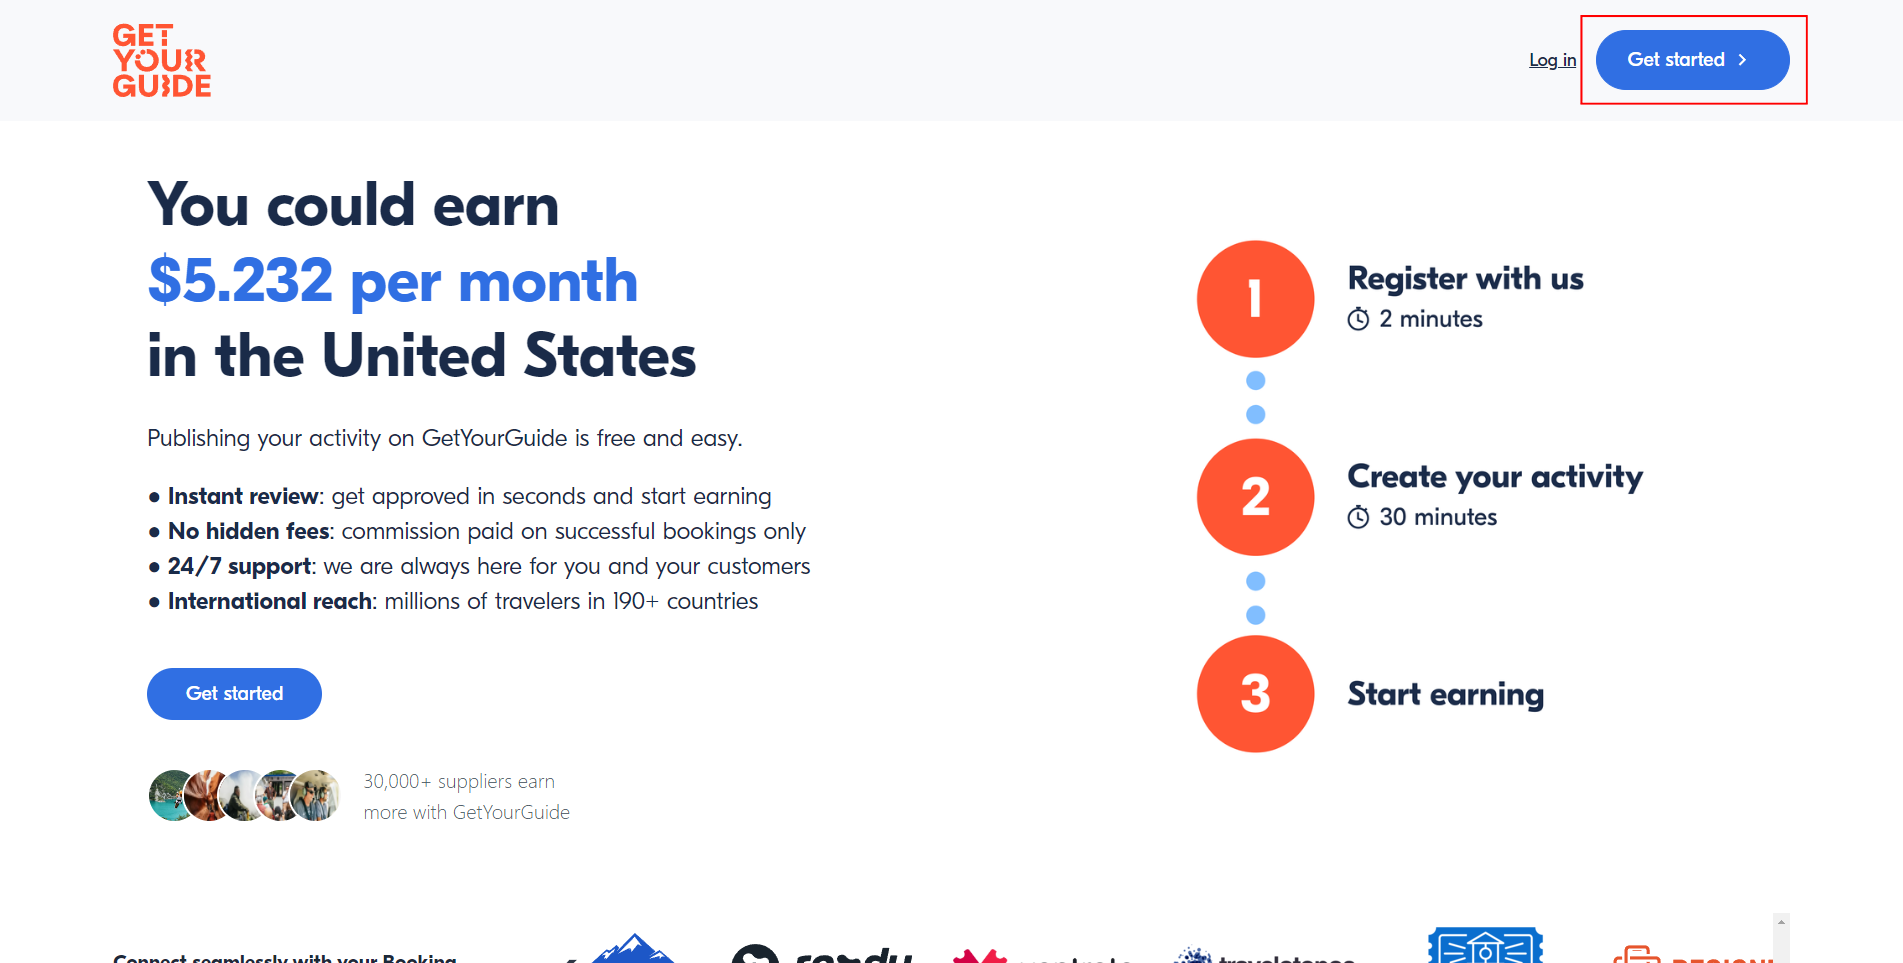
Register your business at GetYourGuide

  1. Go to this link to sign up as an activity supplier at GetYourGuide:
    supplier.getyourguide.com
  2. Click the blue button in the top right corner to start the registration process.
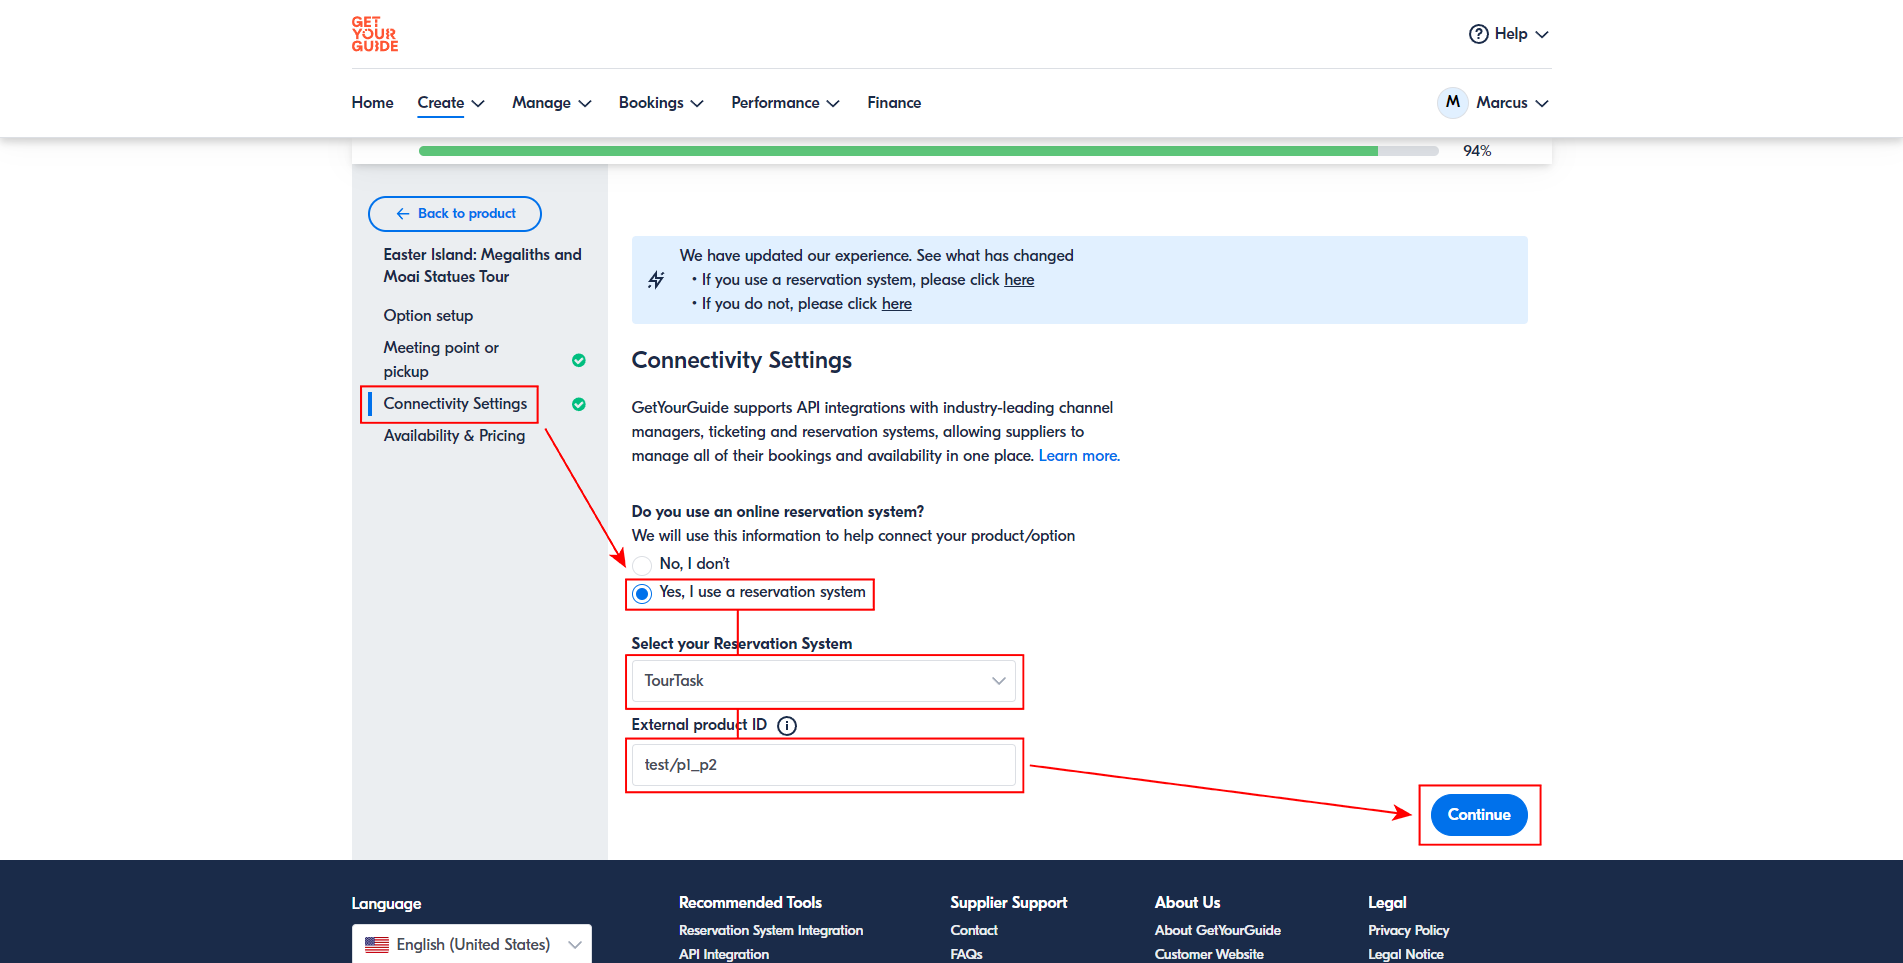
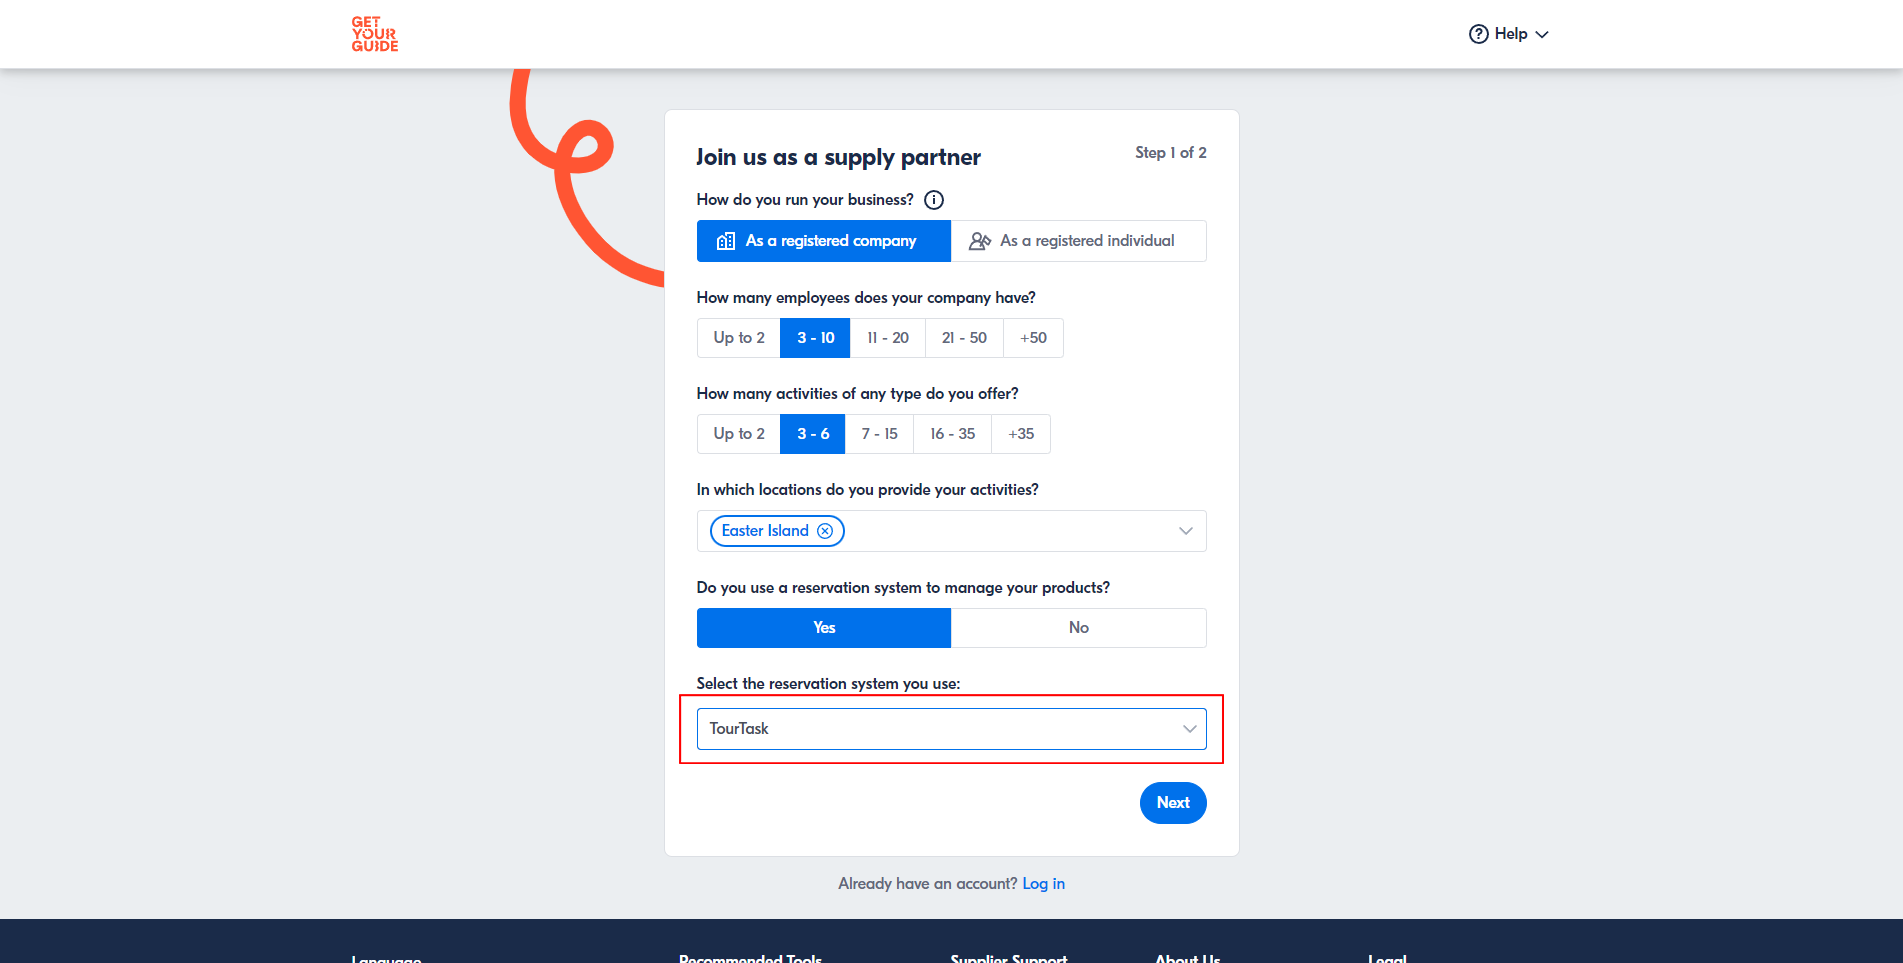
  3. Fill out the form with your business information and select TourTask as your reservation system.
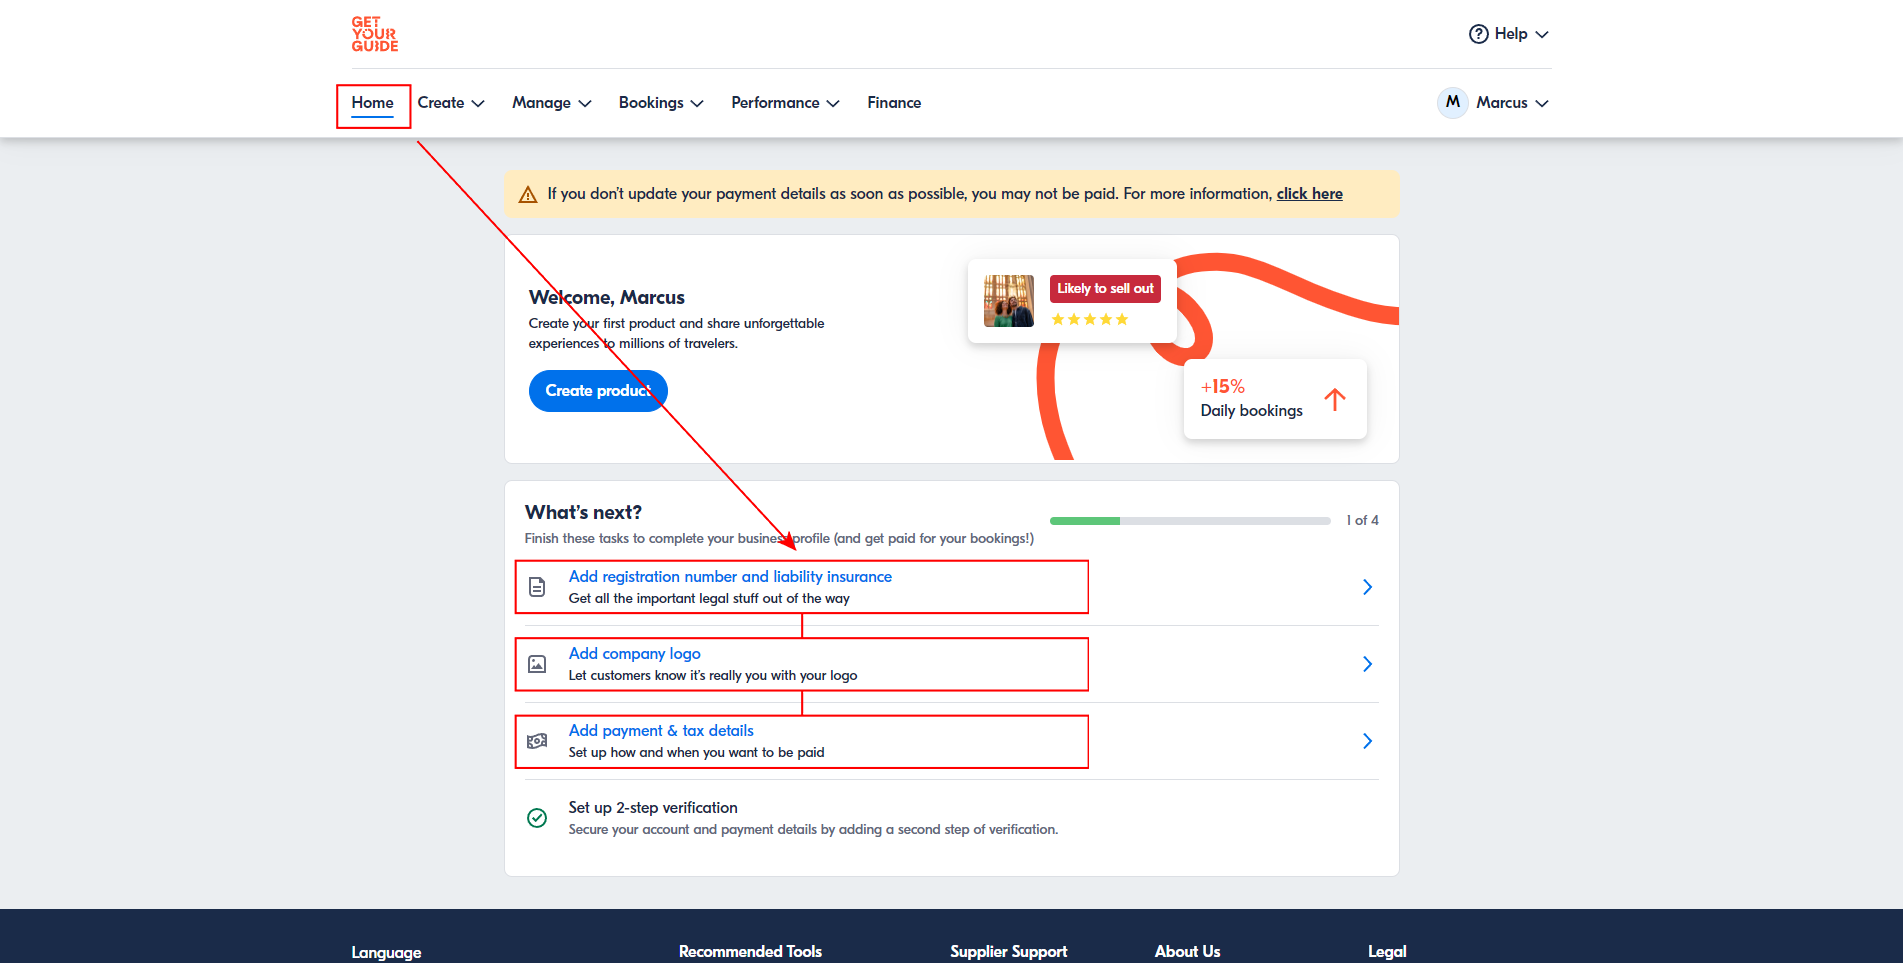
  4. Finish the registration process and log in to your new GetYourGuide supplier account.
  5. Once logged in, fill out all of the necessary business and financial information and upload a logo to complete the business registration.

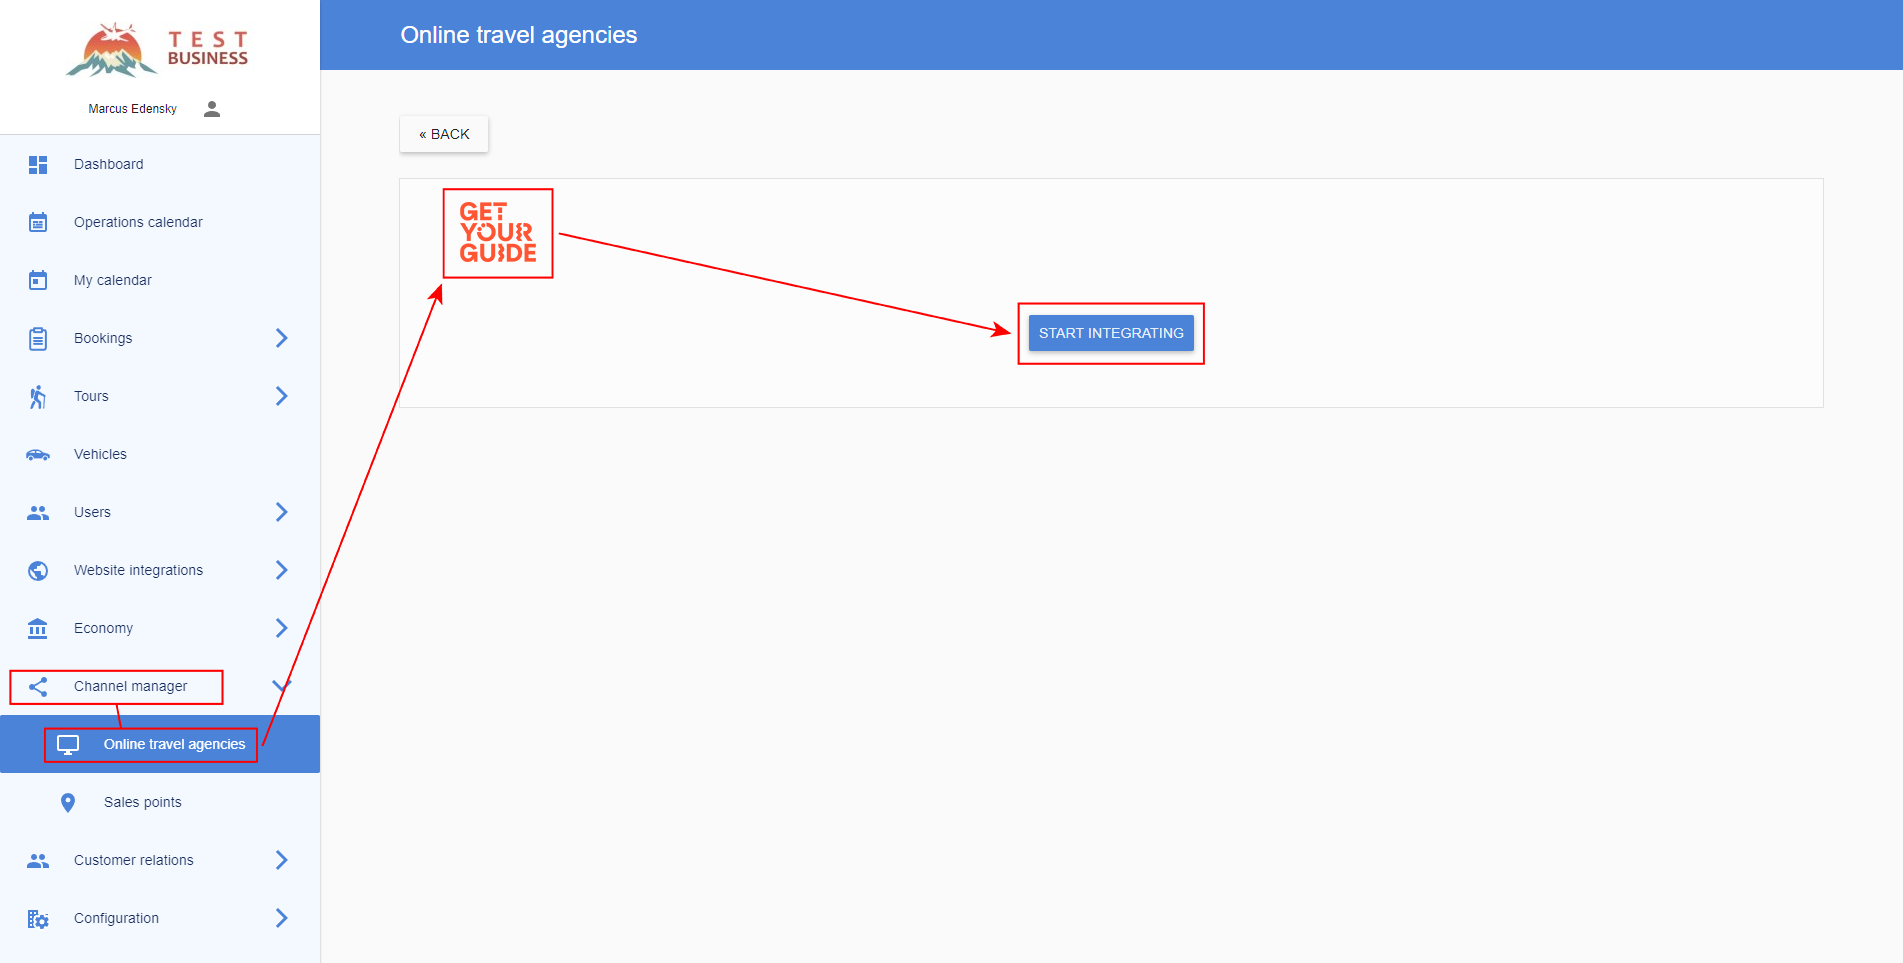
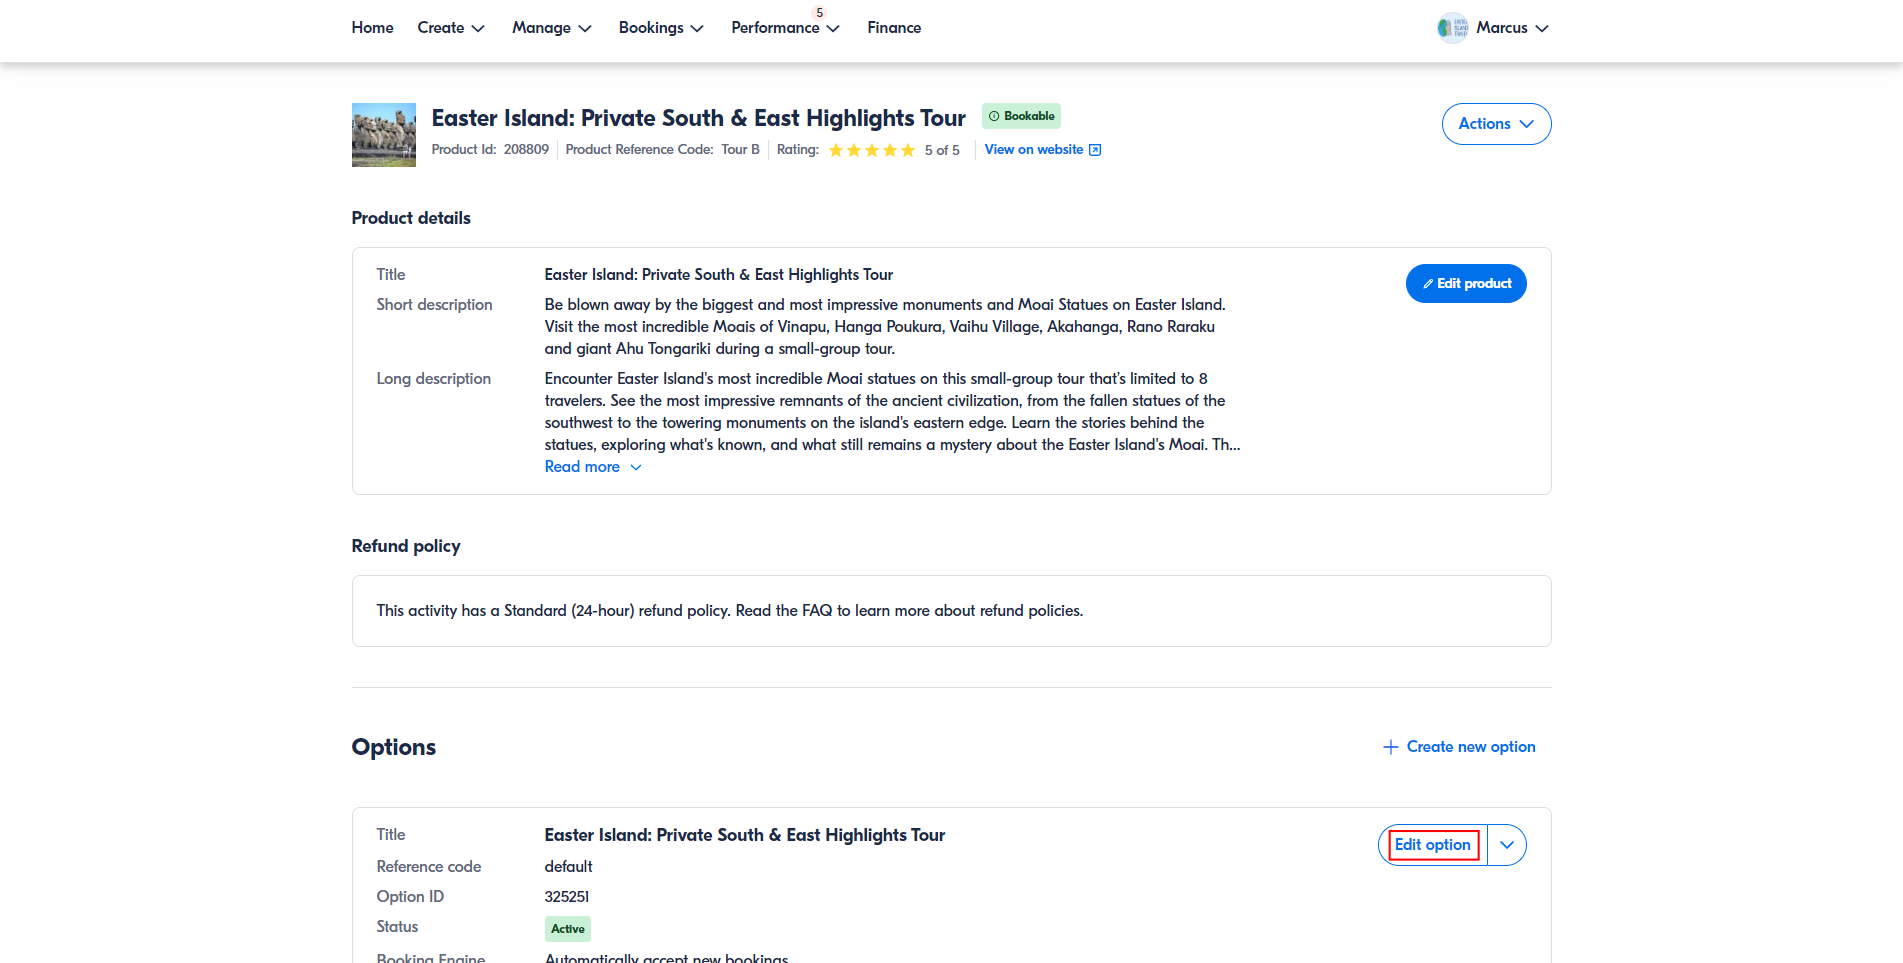
Activate GetYourGuide in TourTask

  1. If you haven't activated GetYourGuide in your TourTask panel yet, then you can do this by going to Channel Manager > Online travel agencies > GetYourGuide and clicking Start integrating.
  2. In the GetYourGuide purchase flow, space will be reserved in your system in the form of a temporary unconfirmed booking before the customer pays and the booking is confirmed. Since the customer details are unknown at this point, these unconfirmed bookings will be created under a specific user in your system. Please specify this user under Channel Manager > Online travel agencies > GetYourGuide > User. Notifications of when these unconfirmed bookings are created and expire will be sent to this user. If you wish, you may create a new user for this, to not receive these notifications in your main user account.

Set up a product in TourTask

  1. In TourTask you will have to create products for each of your activities in TourTask that you want to feed to GetYourGuide. You will be able to create single-activity products, but you can also add multiple activities in the same product, as well as adding options whenever available.

    Create a new product in your TourTask panel in Channel manager > Online travel agencies > GetYourGuide > Tours > Add new. Add a tour to the new product, select tour type and click Done.

  2. If your added activity has add-ons available that you want to offer on GetYourGuide, you can add options for your product.
  3. If you want to create a multi-activity product, you can repeat the process of clicking the Add button at the top of the dialog and add more activities to the same product. If you do this, you will have to select a Maximum days amount. This is the maximum duration that this product will be allowed to have in order to be considered available. This is particularly useful if you have some shorter tours that can be performed on the same day. Please note that it may also result in your client having a free day in between. TourTask will always select the combination of available tours with least total duration from first to last tour, but if necessary, the full amount of maximum days will be used.

    If you enable Strict tour order, the same tour order as you have specified will be forced. If not, TourTask may switch tour order if necessary to find availability.

    Click Save when you're done.

  4. If you are creating the default version of your product in GetYourGuide, then in TourTask click the product code under Code to copy it, to later paste it into GetYourGuide. If you in GetYourGuide are creating an option different from the standard version, then click the option code under Options and paste that one into GetYourGuide instead.

Create a new product

  1. Make sure you're logged in at supplier.getyourguide.com and then go to Create > New Product. Select your title and description language, and then select your product category. Since you're using TourTask, most probably your product category will be Tour, or possibly also Transfer.
  2. Fill out your product information on the next page. Once you reach the "Options" section, create a new option. GetYourGuide requires at least one option for each product. Start with creating the default option. If your activity has optional add-ons in TourTask that you want to offer on GetYourGuide, you can create these activity variations as additional options.
  3. Under Option Setup > Duration or validity, make sure you select the first option, "It lasts for a specific amount of time (duration)".
    This step is important to make the connection work.
  4. Under Connectivity Settings > Do you use an online reservation system? select Yes, I use a reservation system, search for and select TourTask and paste the product code from TourTask into the External product ID field. Please note that if this is an option different from the standard version, then you should paste the correct TourTask option code instead of only the default TourTask product code.
  5. Under Availability & Pricing select Price per person and click Add new pricing. Please note that if you want to charge all customers the same, simply don't activate any other price groups than adult.
    This step is important to make the connection work.
  6. Even if you're charging everyone the same, make sure you select the second option Price depends on age, eg: adults, child, senior, etc. Add any age groups that you would like to use. If you're not charging differently depending on age, just stay with the Adult age group. Make sure you have the same age groups activated in your TourTask panel.
    Please note that TourTask only supports the following age groups: Infant, Child, Youth, Adult and Senior.
  7. Under Availability & Pricing > Price > Do you want to apply the prices that you have specified in your reservation system? select No. If you are creating a product that contains a private tour, then typically you'd want to add scaled pricing by clicking Tier price. You can then specify the price per person for each passenger amount. If your product only contains group tours and you're not using scaled pricing, then just add the price per person and click Save and continue.
    Please note the commission that GetYourGuide charges. Make sure you specify a price that is high enough to cover this commission. You can use the form below to calculate the price you need to charge in order to receive a specific amount.
    Amount customer pays: {{priceCalc.amtToReceive / (1 - priceCalc.commissionPercentage / 100) | number:2}}
    We have chosen to not support sending pricing information from TourTask to GetYourGuide, since GetYourGuide only support flat rate pricing when using this feature, which would complicate things if it's a private tour, in which case you would typically want to use scaled pricing.
  8. The next step, Itinerary builder, is optional, but recommended to increase sales. Afterwards, in the last step send the product for review, and you're done!

Connect an existing GetYourGuide product to TourTask

  1. Log into your GetYourGuide supplier account at supplier.getyourguide.com.
  2. Go to Manage > Products and click See details on the activity you want to connect to TourTask.
  3. Click Edit option for the option you want to connect. Please note that if you have multiple options for the same activity, you will have to connect each option separately.
  4. Under Option Setup > Duration or validity, make sure you select the first option, "It lasts for a specific amount of time (duration)".
    This step is important to make the connection work.
  5. Under Connectivity Settings > Do you use an online reservation system? select Yes, I use a reservation system, search for and select TourTask and paste the product code from TourTask into the External product ID field. Please note that if this is an option different from the standard version, then you should paste the correct TourTask option code instead of only the default TourTask product code.
  6. Under Availability & Pricing select Price per person and click Add new pricing. Please note that if you want to charge all customers the same, simply don't activate any other price groups than adult.
    This step is important to make the connection work.
  7. Even if you're charging everyone the same, make sure you select the second option Price depends on age, eg: adults, child, senior, etc. Add any age groups that you would like to use. If you're not charging differently depending on age, just stay with the Adult age group. Make sure you have the same age groups activated in your TourTask panel.
    Please note that TourTask only supports the following age groups: Infant, Child, Youth, Adult and Senior.
  8. Under Availability & Pricing > Price > Do you want to apply the prices that you have specified in your reservation system? select No. If you are creating a product that contains a private tour, then typically you'd want to add scaled pricing by clicking Tier price. You can then specify the price per person for each passenger amount. If your product only contains group tours and you're not using scaled pricing, then just add the price per person and click Save and continue.
    Please note the commission that GetYourGuide charges. Make sure you specify a price that is high enough to cover this commission. You can use the form below to calculate the price you need to charge in order to receive a specific amount.
    Amount customer pays: {{priceCalc.amtToReceive / (1 - priceCalc.commissionPercentage / 100) | number:2}}
    We have chosen to not support sending pricing information from TourTask to GetYourGuide, since GetYourGuide only support flat rate pricing when using this feature, which would complicate things if it's a private tour, in which case you would typically want to use scaled pricing.
  9. Your GetYourGuide product option is now connected to TourTask! You must now repeat this process with all options for all of your GetYourGuide products.